Arduino Uno Stepper Motor Control: Unlock Precision Motion with Simple Code
Arduino Uno Stepper Motor Control: Unlock Precision Motion with Simple Code
For hobbyists, engineers, and makers alike, controlling mechanical movement with precision unlocks endless possibilities—from 3D printers and CNC machines to robotics and automation. At the heart of this control often lies the stepper motor, a relic of industrial engineering perfectly adapted for the world of microcontrollers. The Arduino Uno, with its accessibility and versatility, emerges as the ideal platform for beginners and experts to master stepper motor control.
This guide delivers a clear, practical roadmap to integrating stepper motors with Arduino Uno, leveraging both hardware and a straightforward software interface to achieve exact motion. Whether you’re building a small automated system or diving into advanced mechatronics, understanding how to command stepper motors with Arduino is not just useful—it’s foundational. $$
Stepper motors operate on discrete pulses, moving in precise, controlled increments without feedback systems, making them ideal for applications requiring exact positioning.
The Arduino Uno, with its built-in pin outputs and open-source ecosystem, provides a low-barrier entry to executing complex step sequences based on simple programming logic. This synergy allows users to translate digital commands into mechanical motion—effectively turning code into motion.
To begin, consider the stepper motor itself: unlike traditional DC motors, stepper motors move in fixed angular steps—often 1.8 degrees per full step—controlled by delivering electrical pulses to multiple coils. Each coil activates in sequence, causing the rotor to rotate in discrete jumps.The Arduino’s GPIO (General Purpose Input/Output) pins drive these coils by applying high current (typically via transistors or driver chips like the A4988 or DRV8825), which energizes the windings in a programmed order. $$
Selecting the right stepper motor is critical. Stepper motors come in several configurations—unipolar, bipolar, and hybrid—with varying step angles, torque, and voltage ratings.
Most widely used are 28BYJ-48 and DRV-WIR45S models, offering 200 steps per revolution and built-in drive electronics. These 28BYJ-48 units typically require a driver chip, such as the A2988 or DRV8825, to interface with Arduino outputs, enabling current control and reducing electrical stress on microcontroller pins. Without proper driver support, continuous Arduino grounding of multiple coils risks damaging the microcontroller—a key caveat for safe operation.
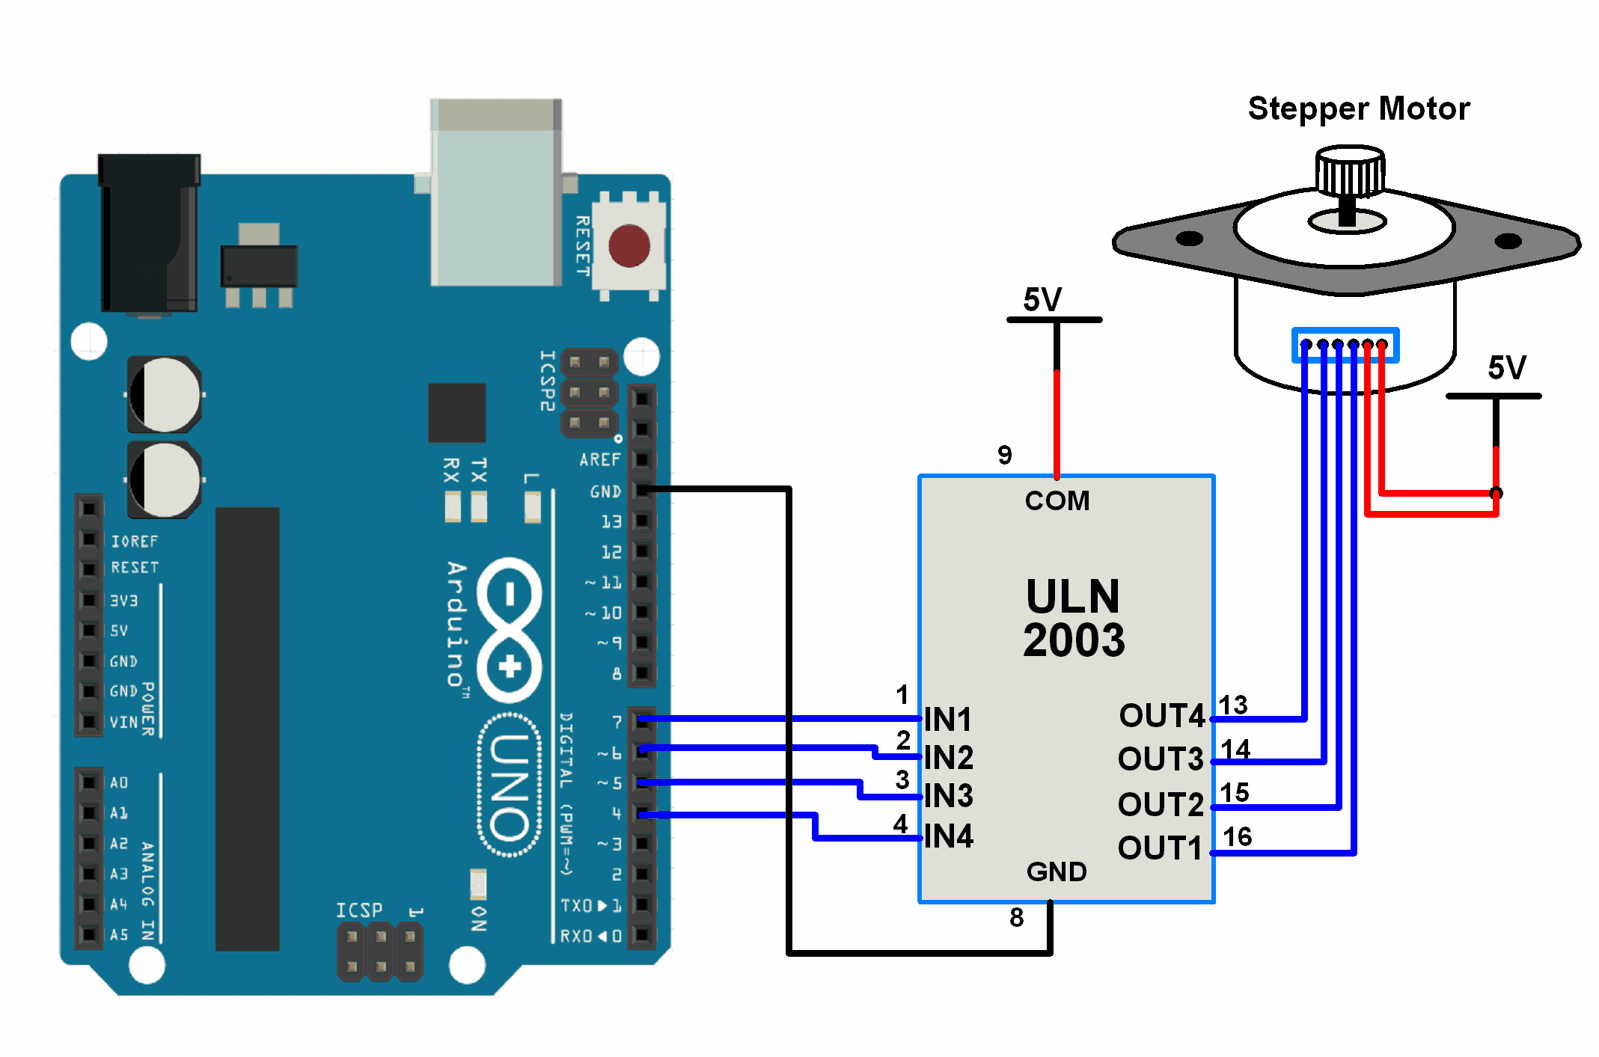
Wire-up begins with connecting the stepper motor coils to the driver IC, then linking each control output pin on the Arduino Uno to a digital pin via current-limiting resistors (commonly 0.1Ω) or via driver hardware.For signal integrity, combine Christopher Allen’s classic “chopped current” method: rapid high-frequency pulses (over 100 Hz) minimize heat and vibration by preventing current buildup in long wires. This technique ensures smooth, silent motion, essential for applications like 3D printers or CNC routers. $$
The Role of Driver ICs and Current Control
Stepper motors draw substantial current—often 2–15 amps depending on size and resolution.Arduino digital pins cannot supply this current directly, necessitating driver chips. The DRV8825, for example, accepts low-current signals from Arduino pins and delivers high current (up to 5A per channel) to the motor coils. Using microstepping—gradually increasing or decreasing steps through pulse width modulation—improves motion smoothness, reduces resonance, and extends mechanical life.
Pairing driver ICs with proper gear reduction (via worm gears or belts) enhances torque and precision, enabling control of heavy or inertial loads. $$
Stepper Motor Control with Arduino Code: Practical Implementation
Programming stepper movement with Arduino relies on discrete step commands. The `pulse()` and `step()` functions allow precise control: `step(1)` advances one step per input, while `step(100)` microsteps the motor for finer resolution.Libraries such as Accelerated Motor Controller (AMC) or stepservo simplify motion by abstracting low-level timing and microstepping. Example code snippet: ```cpp #include
$$
Applications in Real-World Systems
Stepper motors integrated with Arduino power diverse systems. In 3D printing, stepper-controlled print heads and bed endstops move with micrometer precision. CNC routers use synchronized motors for accurate material cutting, driven by milling machine control software.Automated lab equipment, such as incubators adjusting vents or incubator temperature via motorized dampers, relies on reliable stepper actuation. Even consumer projects—like upcycled conveyor systems or robotic claws—benefit from Arduino’s low cost and learning curve, making stepper control accessible beyond industrial settings. $$
The Truth About Torque, Voltage, and Reliability
One frequent pitfall lies in underestimating torque requirements.Each step requires mechanical and electrical torque to overcome inertia and friction. A stepper operating beyond its rated torque vibrates, heats up, or stalls—damaging both motor and control electronics. Always consult motor datasheets specifying current draw and operating RPM.
Pair motors with suitably rated drivers—DRV8825 supports 5A per channel—ensuring current scales with load. Running motors at maximum resume current (up to 2–3x idle) for short bursts can cause overheating; sustained high current risks permanent coil damage. Current-limiting resistors, while effective, increase voltage drop across wires.
In long runs (>1 meter), this affects signal integrity, potentially causing missed steps. Replace resistors with driver ICs: these maintain ideal current even with wire resistance, preserving performance and reliability. $$
Safety, Integration, and Best Practices
Physical installation demands care: secure motor mounting to minimize backlash, align stepper shafts with leadscrews to reduce wear, and use damping materials where vibration is an issue.Wire routing should avoid high-electrical-noise areas to prevent signal corruption—twisted pair or shielded cables improve signal integrity in sensitive setups. Implement periodic sensor feedback—like Hall effect sensors—to close loop control if higher precision is needed, though basic open-loop control suffices for most hobby projects. Node on popular driver platforms: the A4988 remains widely used but requires careful decoupling and heat management, while the DRV8825 offers better current regulation, reduced noise, and simplified grounding.
Both demand resistors for cathode protection and careful pin assignment to prevent short circuits. Safety checks include verifying motor burn-in time before full-load operation, using fuses at the driver outputs, and monitoring temperature via thermal showbread or fan enclosures. These measures protect both hardware and user, especially when motors actuate heavy payloads.
Hands-on experimentation reveals incremental improvements. Adjusting drive current via PWM, testing microstepping ratios from 100 to 200 or higher, and fine-tuning timing loops enhance synchronization. Logging step counts and movement accuracy might require external clocks or serial monitoring—tools that bridge basic code with professional testing.
The true strength of Arduino stepper control lies in its accessibility: a beginner can sense motion with simple `step(1)` calls, while advanced users layer complexity through firmware, feedback loops, and custom profiles. Whether assembling a first project or refining a production-grade system, stepper motors on Arduino Uno deliver precision, adaptability, and a learning curve that rewards persistence. In an age driven by automation and smart systems, understanding stepper motor control with Arduino Uno equips makers with a foundational skill—one that powers innovation across domains.
From simple motion automation to sophisticated robotic interfaces, this integration proves that powerful mechanical control can be simple, programmable, and deeply rewarding. With careful attention to drivers, current, and mechanical design, the Arduino stepper motor guide transforms code into motion—beginning not with complexity, but with clarity.


Related Post

How Old Is Lil Rt? Unlocking the Age of the Viral Star’s Rise

Vikram Actor Wife: The Quiet Strength Behind the Spotlight

Federalism and Anti-Federalism: The Battle That Shaped America’s Constitutional Balance

Unraveling the Silent Transformation: How Alpha Decay Reshapes Our Understanding of Radioactivity


